 In this chapter we will learn about Child to Parent communication and focus will be on handling event using event listener. I have divided the chapter in three sections to cover each element fully.
Topics Covered:
Section 1:
- What are event Listeners
- addEventListener
- removeEventListener
- Use Cases and Understanding Code
Section 2:
- Event Propagation: Event Bubbling and capturing
Section 3:
- Attach Event Listener Programmatically
- Use Cases and Understanding Code
Section 1
What are Event Listeners?
The event listeners are just like event handlers, except that we can assign as many event listeners as we like to a particular event on particular element.
Example:

app.html
<template>
<lightning-card title="Event Listener Example">
<lightning-button class="myBtn" label="Click Me"></lightning-button>
</lightning-card>
</template>
app.js
import { LightningElement } from 'lwc';

export default class App extends LightningElement {

    renderedCallback(){
    const btn = this.template.querySelector(".myBtn");
    btn.addEventListener("click", this.firstFunction);
     btn.addEventListener("click", this.secondFunction);
    }

     firstFunction(){
        console.log("The first function executed successfully!");
    }

     secondFunction() {
        console.log("The second function executed successfully");
    }
}
Now, if you run the above example and click the button, both functions will be executed.
Demo
Understanding Event Listeners:
Now we will understand event Listeners in more detail.
The addEventListener() method
The addEventListener() method attaches an event handler to the specified element.
Syntax
element.addEventListener(event, function, useCapture);
- The first parameter specifies the event type (e.g. click or mousedown).
- The second parameter defines the function to be called and executed when the event occurs.
- The optional third parameter is a boolean value using which you may specify whether to use event capturing or bubbling.
Note: Unlike setting the event handlers through HTML attributes such as onclick, we don’t need the on prefix here. All you need to write is click, needed to specify the type of the handled event.
removeEventListener();
The removeEventListener() method removes an event handler that has been attached with the addEventListener() method.
Example

app.html
    <template>
        <div class ="myDIV">

          <lightning-button class='btn1'
           label='stop click me'
          onclick={removeHandler}>
        </lightning-button>

        </div>

        <div class="demotext"></div>

</template>
app.js
import { LightningElement } from 'lwc';

export default class App extends LightningElement {
showmsg;

renderedCallback(){
console.log('inside rendercallback');
     let elm = this.template.querySelector('.myDIV');
    console.log('elm'+elm);
     elm.addEventListener('mousemove',this.myFunction);
}

 myFunction() {
 console.log('inside myfunction');
}

 removeHandler() {
 console.log('inside removehandler');
this.template.querySelector(".myDIV").removeEventListener("mousemove", this.myFunction);
}

}
app.css
.myDIV {
    background-color: coral;
    border: 1px solid;
    padding: 50px;
    color: white;
  }
Understanding Code:
elm.addEventListener(‘mousemove’,this.myFunction);
addEventListener adds myFunction on mousemove
i.e. when I go to div move my mouse then myFunction get executed and console.log keeps displaying
this.template.querySelector(“.myDIV”).removeEventListener(“mousemove”, this.myFunction);
I have added removeHandler function on click of button so on click of it we remove myFunction which we have added using addEventListener so console.log does not get executed anymore.
Demo
Section 2
We read in earlier section that in addition to the event type and listener function addEventListener function accepts one more Boolean parameter useCapture. This is an optional parameter which specifies whether to use event bubbling or event capturing.
syntax :
target.addEventListener(event, function, useCapture);
Event bubbling and capturing are two ways of propagating events.
Understanding the Event Propagation
Event propagation is a mechanism that defines how events propagate or travel through the DOM tree to arrive at its target and what happens to it afterward.
What is event bubbling and Capturing?
Events are propagated in two phases, capture and bubble. When the event is fired, event propagation starts from root component (ultimate parent) in hierarchy – this is called capture phase.
Once it reaches the component (where the event actually fired), it starts bubbling to root again – this is called bubble phase.
Most of our components that we write in LWC are work in bubble phase.

Real time example
Meaning of bubbling in real life is bubble goes from bottom of glass to the top of the glass when we pour soda to the glass.

On a web page bubbling means when we have an event on an element, the execution goes from lowest element to the top.
Example: We click a button, we not only click that button but you actually clicking parent and its parent all the way to the body.
1. When bubbles : false and composed : false (Default behavior) –
- This is the default behavior, and bubbles and composed are not required to be defined explicitly.
- When this is in effect, the event would not bubble up the DOM, as well as it would not cross shadow boundary.
- We can listen these event only via defining the event handler to component that fires the event.
2. When bubbles : true and composed : false
In this behavior, the event bubbles up the DOM, but don’t cross the shadow boundary. In simple terms, It bubbles up inside the current template, in which event is fired, but it would not cross it’s boundary.
For example :- There are two component, where parent component contain child component. If event is fired inside child component, the event only bubbles up inside child component, and it would not cross it’s boundary, and parent component will not be able to listen this event.
Attach an Event Listener Programmatically
In this case we will define listener and handler function in the JavaScript file itself.
Sample
import { LightningElement } from 'lwc';
export default class Parent extends LightningElement {
  constructor() {
    super();
    this.template.addEventListener('listenerHandler', this.handleListener);
  }
  handleListener = () => {};
}
IMPORTANT : Don’t use addEventListener(eventName, this.handleNotification.bind(this)). It’s an anti-pattern because bind() returns a new function and thus the component can’t call removeEventListener() with the same function instance. Because the component can’t use the same function instance, the listener creates a memory leak.
Example : Attach an Event Listener Programmatically
child.html
Added input will onchange event handler. It is calling handeChange function
<template>
        <div class="slds-m-around_medium">
<!-- Create child component component from where we will raise a
 event-->
            <lightning-input
            label="Enter Name"
            onchange={handleChange}>
          </lightning-input>
     </div>

</template>
child.js
Step 1 – Create event- new customEvent(eventName, props);
Step 2 – dispatch event- this.dispatchEvent(new customEvent(eventName, props);
import { LightningElement } from 'lwc';

export default class child extends LightningElement {

   handleChange(event) {
        const name = event.target.value;
        const selectEvent = new CustomEvent('myfirstcustomevent', {
            detail: name,bubbles:true
        });
        console.log('selectEvent: '+ selectEvent);
       this.dispatchEvent(selectEvent);
    }
}
parent.html
We are nesting child component in parent component by adding c-child
<template>
  <lightning-card title="Child Component">
    <div class="slds-m-around_medium">
        <c-child></c-child>
         Value From Child :  {greeting}

    </div>
        </lightning-card>
</template>
parent.js
Define both the listener and the handler function in the c-parent JavaScript.
Step 3: Attach Event Listener using addEventListener.
Step 4: Handle the event – Define the handler function handleCustomEvent in JavaScript file.
import { LightningElement  } from 'lwc';

export default class app extends LightningElement {
    greeting;
   constructor(){
       super();
        this.template.addEventListener('myfirstcustomevent', this.handleCustomEvent);
   }

    handleCustomEvent = () => {
        this.greeting = event.detail;

    }
}
Demo
Point to Remember : Events Up, Properties Down
In a complex component (one that contains several parent and child components) we recommend you propagate the event up through the component hierarchy, so parent components can respond to child events. If you have other child components (not the one firing the event) you can pass a property down to those children in response to the event.
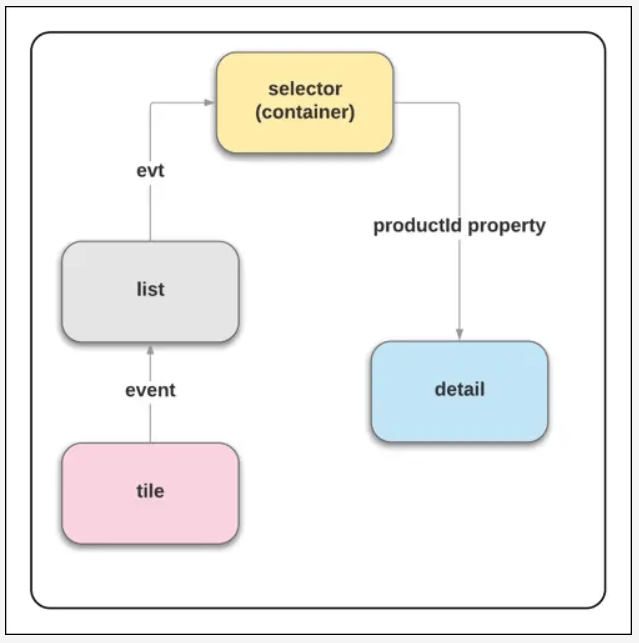
(Image Source: Handle Events in Lightning Web Components)
Everything that is now easy for you was once hard in the beginning.
Together we can learn faster !
Join LWC study group on Telegram
Subscribe to Youtube channel and blog to get latest updates
Reference
StackExchange: How to handle Events
Event bubbling and capturing in JavaScript
StackExchange:Receive message from embedded frame
StackExchange:Child to grandparent communication
Handle Events in Lightning Web Component
Stack Exchange: Event Bubbling in Lightning Web Component
Capturing Event from LWC to Aura
What is need of bubble and composed in LWC